
This article shows you how to properly insulate your loft (attic). This is a relatively easy job and needs no DIY skill.
In the UK, you can apply for grants from your local council to have your loft insulated for free or low cost. If your house hasn’t benefited from cavity wall insulation, you can also apply for a grant to get this done. Based on your income, you can get a tidy sum off the total cost, or get the work done free of charge! Call your local council for details.
Tools for all-round insulating: (click on the linked items to purchase if necessary)
Loft insulation
Door draft excluder
Safety gloves and glasses
Sealant gun
Letter box excluder
Safety mask
Pipe insulation
Door frame sealant tape
Stanley knife
Tape measure
Masking tape
Club hammer
How to properly insulate your loft
Up to a quarter of the heat your home loses is through the loft space. You pay expensive rates for your heating, only to let it escape from your living quarters, and out through your roof. It’s time to keep in the heat you’ve already paid for.
Important: you need safety gloves, mask and goggles. I learned this the hard way. The insulation stuff is very scratchy and it becomes harder to breathe, the longer you’re exposed to it.
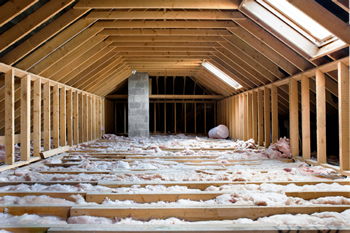
1. Lay a piece of sturdy wood over the joists in your loft before you start measuring up. This is vital for 2 main reasons: You don’t want to step into the ceiling accidentally. This will incur expensive repairs. It’s very easy to do; one miss-step and your bedroom ceiling ends up with a gaping hole in it. Also, a board enables you to walk around safely in the loft without having to balance on the joists.
To measure how much insulation you need: Measure the gap between the ceiling joists (the slats that stick out). Count how many spaces there are between all your joists. Measure the length of your loft, then take this to your local DIY shop….
2. Remember to wear your protective clothing! Start with at the farthest corner of your loft and unroll the length of insulation between the first 2 joists. Lay subsequent rolls on top of the bottom one until you’ve reached the recommended thickness of about 250mm. Ask your local council if you’re unsure of what this limit is.
3. Continue laying rolls of insulation until you’ve filled up the loft space.
Important: leave a small gap between the insulation and the eaves to allow for proper ventilation. Also remember that you should never press down on the insulation. This will render its effectiveness null and void.
In addition, compressing it could damage your ceiling, resulting in expensive repair work. If you need the loft space for storage, lay chipboard on a built-up boarded area, making sure the insulation is not compressed at all. (We learned this the hard way too, but you can be prepared for this before doing the loft insulation work). You can’t store anything directly on the insulation.
Once you have your insulation done, the venues are safe and secure, but may no longer be suitable for the storage you once had.
4. When the loft is done, remember to cut a piece of insulation, cover it with a bin liner, and tape it to the inside of your loft hatch. Heat will escape through the latch if this isn’t done, then all your hard work could be in vain.
Now you have an idea on how to insulate your loft to save on your electricity bills. This site hosts a wide array of DIY Tutorials. See how much you can learn by viewing the list. If you liked ‘How To Properly Insulate Your Loft‘ please share it on your favourite networking sites. Thank you.


I loved reading your article. Thanks for sharing.
Thanks for this article, is very usefull, i make exactly from this stepts. Thanks again!
We have not used the rolls of insulation for attics and lofts for quite some time. We switched to a blown in product with a higher R-value. I guess you could still do it that way but down in south Florida a guy would die staying in an attic long enough to install batt insulation that way. Just way to hot.