Here’s a step-by-step tutorial on how to repair a dripping tap. Always follow the manufacturer’s guidelines to prevent flooding and spilling accidents.
Most modern taps have their own isolating valves. You should always turn this off (give it a quarter turn) before doing any work on your tap. If your tap doesn’t have an isolating valve, find and turn off your water from the mains. Once you’ve done this, turn on all your taps and run them dry.
How to repair a dripping tap
You will need an adjustable spanner , pliers
 and a new washer.
|
stop that dripping tap
image |
1. Take off the top face of the tap. If you can’t do this with your fingers, use pliers. The top face is the part of the tap which is coloured or says, hot or cold. Remember to plug the sink and place all the small parts into a bowl. You don’t want to lose any screws by accident.
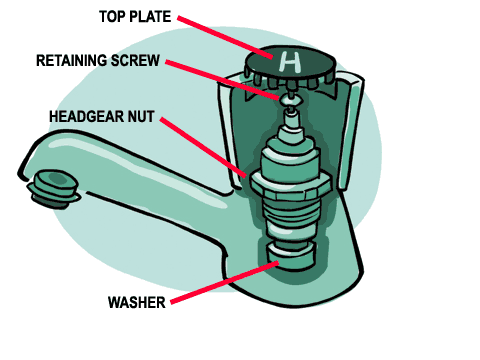
2. You should be able to see a screw inside the exposed area. Unscrew that and take off the handle. You will see the headgear nut. Here’s what it looks like:
3. Take off the body of the tap. You should be able to just remove this now. If you can’t do it by hand, use a spanner, but use a cloth to protect your tap from tool marks.
4. Use an adjustable spanner to remove the headgear nut. Be careful not to twist or dent it.
5. Take off the washer (indicated above). Check to see if it’s merely pressed into placed or held down by a nut. Use a knife or any other type of flat blade to dig the washer out.
6. Replace the old washer with a new one. Press it down firmly and replace everything in the order in which they were removed. You’ve now repaired your dripping tap!
These books will help you with various diy plumbing needs.
About Anne
Anne Lyken-Garner, the owner of
DIY Projects is the published author of the inspirational memoir, Sunday's Child (available on Amazon). She's also a freelance writer, blogger and editor. She writes for, and manages 4 blogs. See how Anne can help you with editing your site at the
Hire an Editor page above.


Great tutorial and fantastic graphics. Could I just add that another cause of dripping taps is a worn seating. This is where the tap washer pushes against to create a water tight seal. The seating can get dirty or pitted and damaged. You can buy a tap re-seating tool for little money and this will rejuvenate the seating. When changing tap washers I always inspect the seating and clean if required.
W Paul - Plumbing & heating engineer in Solihull
Glad I could help, Lea.
wow, you just saved us about $85!
thank you!
Thanks, Icy. You're my first commentator!
Anne, I found your new blog, and this is a great tutorial to repair the drip without spending so much money calling in a plumber!
One of the useful tips that will help everyone at home and any other place to repair dripping tap this will ensure safety and will save our money too. Thanks a lot for the such a great tips with animated graphics.