Make your own wall storage for free
COST: £0.00
TIME: 1 hour or less
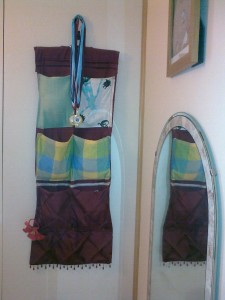
The first two pictures show what your wall-storage looks like on the wall. The choice is yours when it comes to material. What you need to begin with is a piece of cloth that’s long enough to make the back part. Shown here, it’s the red material in the picture. We’ll call it number one.
Make number one as long and as wide as you want, but make sure you have about four inches of material to spare for the top of this wall storage unit.
#1. Fold the top two inches down.
#2. Cut a hole in the centre big enough to pass the top of the hanger through.
#3. Hem the hole so it doesn’t fray and sew the two bits of the folded material together, keeping the hanger between them. The hard part is done!
Note: I used a skirt hanger for this wall storage unit because it’s straight at the top and I like that effect. It also uses up less space at the bottom of your ‘number one’ because it’s not triangular.
Make your own wall storage unit - finishing it
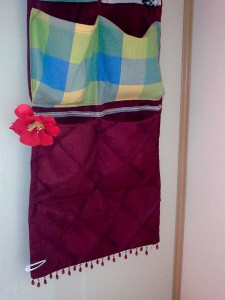
After you’ve done this, get various pieces of scrap cloth and sew onto the number one material. Make sure there’s a mixture of small pockets and big ones. Small pockets can be simply sewn on as normal like these top ones. Bigger pockets are more useful and they need to be pleated at the sides like the plaid ones below. They hold more stuff this way.
Options for your wall storage unit
Leave the bottom of the number one material free for any design you like. You can cross-stitch a pattern, add more pockets, sew on a decorative margin (like the one above) or just leave plain if you wish. This particular red material was an old table runner so it came with the triangular designs you see here. I used this to my advantage and left it as a decorative statement for my daughter’s wall storage. See other ways to beautify your home with fabric here.
Conclusion: make your own wall storage unit
This wall storage is great for caravans and small bedrooms - in fact, it could be adapted to fit any space whatsoever. You could redesign it and add bits for your own use. It won’t take you a lot of time, but if you are stretched for time, see the wall storage hanger already made for you from Amazon. These wall storage hangers make a great gift and tidy up your house at the same time.
See more crafty things you can make for functional and beautiful interiors.
This post was supplied by Morganne Leigh who writes at Speed Loan.
Feng Shui Tips can give you the pick me up you need to make your home a place that improves your well-being. These tips for feng shui are not about increasing wealth (though, as an indirect result they can). They’re about making your home a special place in which you’re able to heal yourself from a hard day working. They’re about making your home a place in which you’re comfortable and peaceful - a place to which you look forward with bliss when you come back from holiday. Before we look at the tips, I want to explain briefly what feng shui is.
Feng shui tips
What is Feng Shui
In Chinese culture, Feng means wind and Shui means water. These two elements are traditionally associated with good health and well-being. Feng Shui therefore, is a belief that if your dwelling space (this could be your home or office etc) has balanced energies, this would enhance and ensure good health and well-being for the dwellers. Positivity is directly related to high achievement - thus higher earning power. People inhabiting a well-balanced space would therefore be able to ‘feel’ the positive energies when the harmony of the way the space is set out is perfect.
Recommended read: Turn a Room Into a Stress-free Sanctuary
Feng Shui tip 1 - clean and clear away
Can you ‘feel’ when a room is clean and clear of clutter? This is a serious question. After you’ve done some major clearing away in a room and have cleaned it thoroughly, can you ‘feel’ the clean? The answer is yes. This is why my first feng shui tip I have to recommend is cleaning and clearing away, especially in the Spring. I use this one every year (twice a year sometimes) to make my home feel lighter. Clutter will seriously clog up your thinking, thus your life. It will get in the way of achievement because it always makes you feel depressed - even when you aren’t.
When you enter a room which is filled with clutter and dust you feel overpowered and overwhelmed. Imagine sitting in your living room for hours, exposed to this kind of negative energy. Think of what this does to you each day of your life. It gets you deeper and deeper buried under slush. Free yourself. Get rid of clutter and give your home and life the space they need to fly and breathe - at least. Use the new growing season of Spring to remind your life what it’s like to live without being buried under oppressive stuff. Give them away. Other people can make use of them.
Feng shui tip 2: ceiling heights
Do you know why we traditionally paint ceilings white and not a darker colour? This is because designers of old realised that higher ceilings enhance the way we think. White ceilings give the illusion of height. No, you don’t have to move house for this one, but if you have low ceilings try painting the top couple of inches of the wall white. Let the ceiling run into the wall to give an impression of being much higher than they really are. Look at some of the makeover work I did to our own home at this page. You’ll see how you can use colours to create relaxing spaces for your family. Feng shui your thinking power and stop feeling trapped in overpowering rooms. Your home is where you live. It’s the place which influences your abilities most of all.
Feng shui tip 3: open plan is good
A long time ago planners created homes with small, divided rooms to conserve heat. These days with central heating, this is not such a big deal. If you can, open up your spaces to create a flow between the front and back of your house. Being able to see the garden from the front window is an emotionally intelligent strategy. It helps you feel secure because you can see your surroundings. This frees the mind and helps you to feel safe and secure. Problems and predators can’t come at you from hidden spaces with hidden agendas because you can see them all and face them head on. Imagine what this feng shui tip does for your well-being and mind set for achieving your goals and taking charge of your life.
Feng shui tip 4: constantly re-live good memories
No one can feel good all the time. This is why we need invigorating items around us to give us a lift when we’re feeling down. Frame pictures of good memories: graduation pictures of achievement, wedding and holiday pictures of feeling great; and family pictures which remind you of the support and love you have in your life.
We don’t always remember the great times we’ve had, especially when we’re going through dull moments. Past support, achievements and great times encourage us by reiterating that there are highs and lows in life. The lows are the very things that make the highs sweeter. This feng shui tip can be applied to everyone, even the most cynical of us. The easiest way to feng shui your life is to keep your surroundings positive at every turn. You live/work there. Whatever that place portrays is what your body will feel. The linked book shows you exactly how simple changes like these will make a lasting and significant impact in your life. I definitely recommend reading it.
Feng shiu tip 5: Soften your hard spaces
Ever wondered why you feel more relaxed in certain homes more than you feel in others? Have you ever noticed how some kitchens make you feel like you’d love to stand around it and chat, while others don’t? This has got a lot to do with the amount of hard and square corners present in the room. The first book below will talk more in detail about this: The Western Guide to Feng Shui: Room by Room. You may not have noticed this, but the rooms of your home which have the most hard corners are those you feel less relaxed in. Hard, pointy (square) corners subconsciously make you feel like you’ll get hurt. You don’t have to get rid of your edges. You can soften them with throws, cushions, and sometimes even a well-placed chair or bean bag.
There are obviously a lot more feng shui tips to help you improve your spaces. I can’t cover them all here, but I’ve included some additional reading (links) in this article, some of which I’ve written and others from other brilliant writers. Have a look and see which one will work for you and your family. I’m sure you’ll find something useful. Have you used any other feng shui tips you’d like to share with us? I’d really appreciate it if you do. We can all help each other live to better.
If you enjoyed ‘Feng Shui Tips’ please send it to someone who can use it and share it on your favourite networking sites. Thank you.
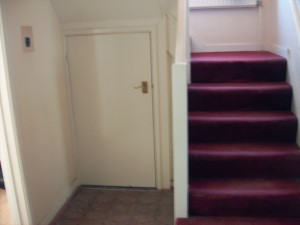
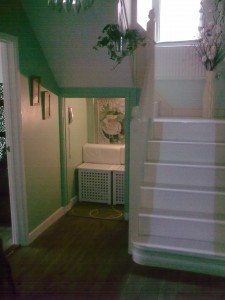
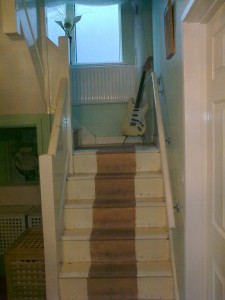
Here’s what we did to pimp our understairs cupboad: This top picture was taken on the day I came to view the house. The red carpet was smelly and old, and screamed, dump me, dump me! It was nice there was storage space, but I thought I could do something nicer still with it. I wanted the hall to extend out and give a feeling of space and elegance. The white door seemed to be in the way, stopping the flow of the hall (which was a nice size to begin with).
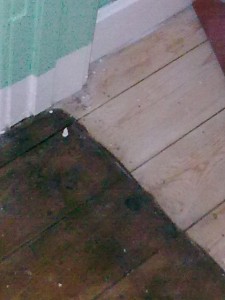
The good thing was, that once we’d remove the red carpeting in the hall, we realised that there was some old lino on the floor beneath it. This was better than the carpet and we lived with that for the time being.
The carpet has now been removed, and the door is also gone, but as you can see above, the damage on the wooden stairs was so intense, it took months to fill all the holes, sand and paint the stairs. Nevertheless, this was a far cry better then the old, red carpet.
Transforming the understairs cupboard
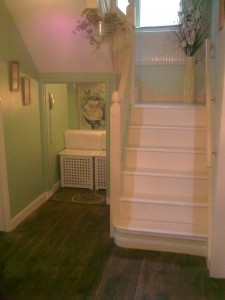
Once we’d finished painting we decided that the floor, though raw wood, would look better without the old lino. It was removed and the floor was stained with cheap wood stain. This will have to stay until we can do better. You can see the complete effect in the ‘after’ picture above. The floor looks rather good.
What we did to pimp our understairs cupboard:
Removed the cupboard door.
Painted the cupboard the same colour as the rest of the hall.
Painted the skirting board the same colour - this joines both spaces and fools the eyes into thinking the two spaces are one room.
The floor was also stained, carrying the same colours and effects though.
Drilled a hole into the bottom of the wall in the cupboard and ran an extension cord into it from the living room. This enabled us to put a light into the dark space.
The storage boxes were spray-painted white. Spraying them is easier than painting because of the holes.
Cushions were placed on the boxes and a painting was placed on the wall. Choose a painting that compliments the colour of your wall.
Attach your phone on the wall and you have a telephone heaven in which to sit and talk for hours if you want.
The rest of the cupboard on the left hand side is still used for storage. Shelves and free-standing cupboards have been put there. You see them, but your guests don’t.
What the understairs room cost
We had all of the furniture, the soft furnishing, the light (hook on) and the painting. Left over paint from the hall was used. Nothing was bought specifically for this project except for the spray paint used to spray the boxes. They used to be natural wood. This cost about £3.00 in total. The spray paint was also used on other little things in the house.
Please share this article on creating an extra room out of your understairs cupboard if you found it helpful. As always thank you for joining the diy projects site. Follow the link for more DIY tutorials. There are several more articles on home improvement on this site.






Top Commentluvvers
Recent post : NYC Weddings: Planning a One of a Kind Wedding
Recent post : Steinepreis Paganin is happy to announce the addition of Matt...
Recent post : Things to Know on How to Style your Deck
Results since : 17th Oct
Will reset on : 27th Oct