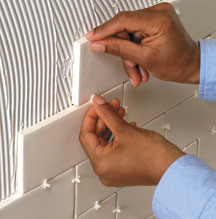
This article will show you how to tile a wall with no fuss. Tiling has always looked harder than it really is. Once you’ve measured the space to be tiled properly, this is the most important hurdle to scale before you begin tiling. Buy more tiles than you think you need. As long as you keep the boxes secure (and your receipt) the store will take back the ones you don’t use. This is because colours in tile boxes can vary. The batch you buy today, even though the same type, may be darker or lighter than the ones you will buy next week.
Lay out the tiles you want for the area to be tiled and try to mix and match the variations of the colours (if needed).
Duration of job:
Depends on the amount to be tiled, but give yourself a day to get the job done if you’re an amateur. Remember you also need 2-3 hours the following day (or a couple of days after) to grout.
Difficulty: 6 out of 10
 |
| tiling your wall image |
Essential tools for tiling
tile cutter ![]()
spiral mixer
trowel![]()
scraper![]()
tile marker![]()
grout float![]()
claw hammer![]()
hacksaw![]()
grout finisher![]()
Other tiling tools
safety goggles![]() (recommended)
(recommended)
For tiling, you may also need
Tiles![]() Wall tile spacers
Wall tile spacers![]() grout
grout![]() tile adhesive
tile adhesive![]() sealant
sealant![]() sponge
sponge![]() corner trim
corner trim
How to prepare a wall for tiles
1. Start applying your adhesive in the corner of two walls so that you can make the best of the two straight lines. If you’re not starting from the edge of the wall, nail in some temporary battens (using thin strips of wood) to give you the right angle to work with.
2. Apply adhesive (on the wall to be tiled) by scooping it up with your trowel. Only apply in 1 square metre at a time because it may dry out before you’re ready to use it. Press adhesive to wall firmly.
3. Once the adhesive is applied, spread it out evenly with a notched spreader![]() (this is a spreader with ridges). Click on the link to see what it looks like. If the spreader is scraping the wall slightly you know that the adhesive is being applied evenly.
(this is a spreader with ridges). Click on the link to see what it looks like. If the spreader is scraping the wall slightly you know that the adhesive is being applied evenly.
Something to think about: Ready-made adhesive (ones you don’t have to mix) can have problems in drying because they depend on the water content evaporating. The adhesive you have to mix will dry quicker because they dry due to a chemical reaction with the air. It may be worth using a quick-drying adhesive if you want to grout the next day. Also, remember to get adhesive which is suitable to the tiles you wish to use for the job.
How to set your tiles down
1. Place the first tile into the right-angle corner of your two walls. Press it in firmly so it makes contact throughout with the adhesive.
2. Place your second and third tiles beside and above your first, respectively. Put your tile spacer into the space between the angles and move the tiles around to fit squarely against the spacer.
3. Push spacers in properly and make sure they’re straight. They are to be grouted over, so you want them to be neat and below the surface of the tiles.
4. Continue tiling until you’ve run out of adhesive-covered wall.
5. Wipe any adhesive off tiles (you don’t want it to dry on because it’s a nightmare to get off) and apply more to another area. Do this until you need to cut tiles.
Cutting your tiles
Here’s how to mark a tile for cutting:
| how to mark your tile for cutting |
Grouting your tiles


Top Commentluvvers
Recent post : NYC Weddings: Planning a One of a Kind Wedding
Recent post : Steinepreis Paganin is happy to announce the addition of Matt...
Recent post : Things to Know on How to Style your Deck
Results since : 17th Oct
Will reset on : 27th Oct